Using custom menus can help you automate and streamline certain tasks in Google Apps Script by creating easy-to-use interfaces so other people can run and benefit from your code.
In this post, we are going learn how to add custom menus to Google Docs, Sheets, and Forms using Google Apps Script. Adding custom menus allows you to customize the UI of the Google App you are using and lets you create custom functions you can bring into your apps to make your job easier.
Access the Script Editor
First, choose which type of Google app you want to write a custom menu for. In this example, I will write a custom menu for Google Sheets using a container-bound script, meaning the script that I’m writing will be attached to the spreadsheet. You can read more about the difference between bound and standalone scripts on the Google Developers page.
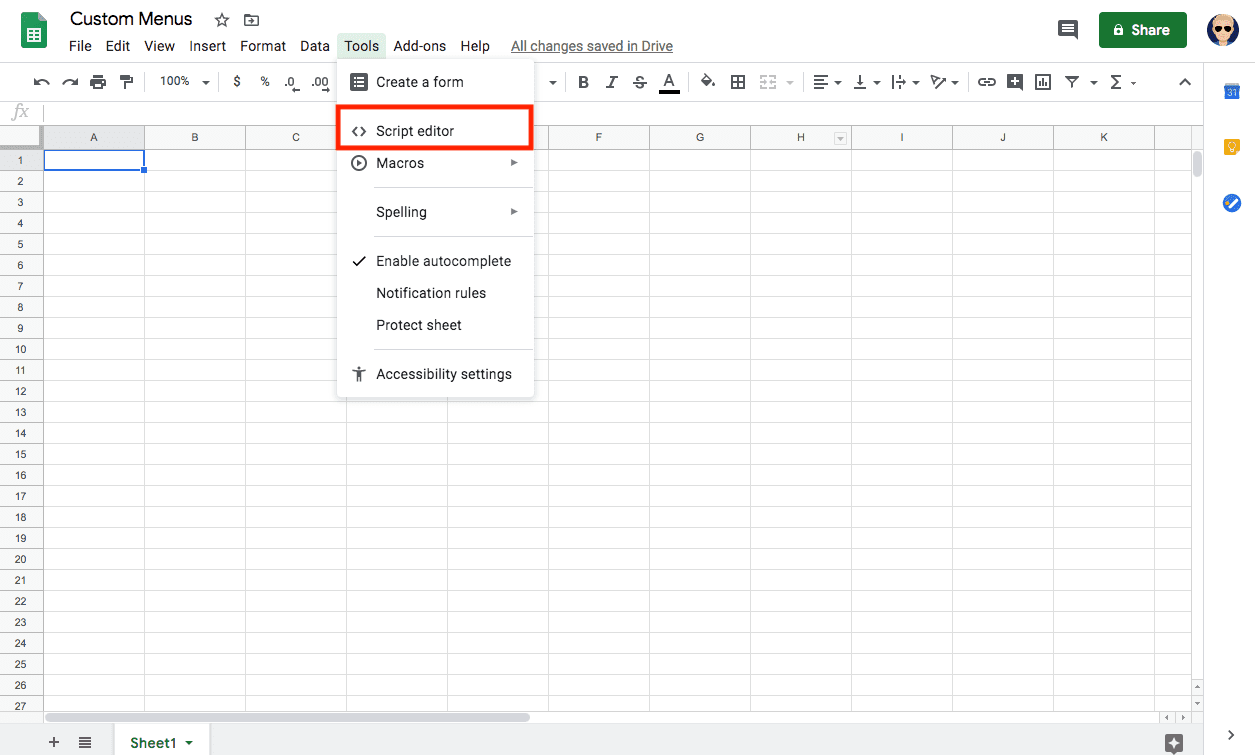
To access the script editor from a Google Sheet, click on the Tools menu and then click on the item labeled Script Editor. The process for doing this is similar across all of the Google App types, like Sheets, Docs, Slides, and Forms.
Since you are opening up the Script Editor bound to this Google Sheet, you can access to a number of handy functions like getActiveSpreadsheet(), getActiveDocument(), getActiveForm() that help you easily access the parent document.
Additionally, there are also triggers like onOpen and functions like getUi that will help us activate features and add them to our custom menus in the next step.
Write a Function to Add Custom Menus
The script editor in Google Sheets provides us with a text editor for our code. We can break this simple script into two parts. The first part will add a custom menu to the spreadsheet’s UI when this specific sheet is opened. The second part of the script defines two custom functions that are called when we click a menu item in the custom menu.
So, let’s get started by writing the onOpen simple trigger function that will help us add our custom menu to the Google Sheet:
function onOpen( ){


// This line calls the SpreadsheetApp and gets its UI
// Or DocumentApp or FormApp.

  var ui = SpreadsheetApp.getUi();


//These lines create the menu items and
// tie them to functions we will write in Apps Script

 ui.createMenu('Custom Functions')
      .addItem('Get Range', 'getRange')
      .addSeparator()
      .addSubMenu(ui.createMenu('Advanced Options')
          .addItem('Get Range Values', 'getRangeValues'))
      .addToUi();
}
To get the menu added to the sheet when the spreadsheet is opened, we need to wrap all of the code for this section in the onOpen()function, which will execute everything inside of it when the spreadsheet is opened.
On line two, we make a call to the SpreadsheetApp, which returns an instance of the current spreadsheet, and from there we use the getUi method to return an instance of the current spreadsheet’s UI, which we store in a variable called ui.
The next several lines all work with the UI variable we just created, and we will string together several method calls to start building our custom menu. First, we call the createMenumethod on our UI variable, and this method takes a string as a parameter for the name of the menu.
Using dot syntax, we continue stringing together method calls and next use addItemto add a menu item.
The addItem method takes two parameters. The first parameter is a string for the name of the menu item that will be displayed in the custom menu. The second parameter is a string referencing the function that will be called when we click that menu item.
We follow a very similar pattern to add a sub-menu, as you can see in the last few lines of code. The final thing we do is call the addToUimethod to add our custom menu to the instance of the current spreadsheet’s UI.
Write Functions Tied to Custom Menu Items
Lastly, we will need to write some custom functions that will be called when we click on the items within our custom menus. We’ll write two functions, one to return the active range location and another to return all of the values in a spreadsheet’s active range.
First, we can define a function called getRange and use some methods inside of the function to get some information about the spreadsheet and alert us through the spreadsheet’s UI.
function getRange() {
  // These lines get the active range, then return the first row and column // in that range
  var range = SpreadsheetApp.getActiveRange();
  var row = range.getRow();
  var col = range.getColumn();


  //These lines call the spreadsheet UI's alert window and pass a message
  SpreadsheetApp.getUi() // Or DocumentApp or FormApp.
  .alert("I'm at this location: \n row:  " + row + "\n col: " + col);
}
Since we already attached this function to a custom menu item before defining it, we are all set to go.
The second function we can call getRangeValues, and this is going to do something pretty similar to getRange, but we’ll get some more specific values from the sheet. The method we’re going to use inside of getRangeValues will return a two dimensional array of spreadsheet values. You can read more about the getValues method for Google Apps Script if you have questions.
function getRangeValues() {
 //Get active range of spreadsheet
 var range = SpreadsheetApp.getActiveRange();
 //Get values in 2d array: values[0][0]
 var values = range.getValues();
 //Call spreadsheet UI's alert window and print values
 SpreadsheetApp.getUi()
  .alert('Here are the values for this range: ' + values);

}
Customize and Use New Menu Items
After linking the two custom functions into the onOpen function, they will be added to the spreadsheet’s menu the next time it is opened. Just click the menu items to test out your newly created timesaving functions. Since we add the menus using the default Spreadsheet UI, there are limited ways to customize your menus. But since Google Sheets treats emoji characters in strings nicely, we can use them as a part of the labels we create for our menu items.
So, if we change the above code that adds the custom menu to look like this:

We wind up with some cool menu items that look like this when we access them from our Spreadsheet. Adding nuances like this can be a huge help to the people using your tools or add-ons and iconography tends to increase the understanding of what an interface options might do.

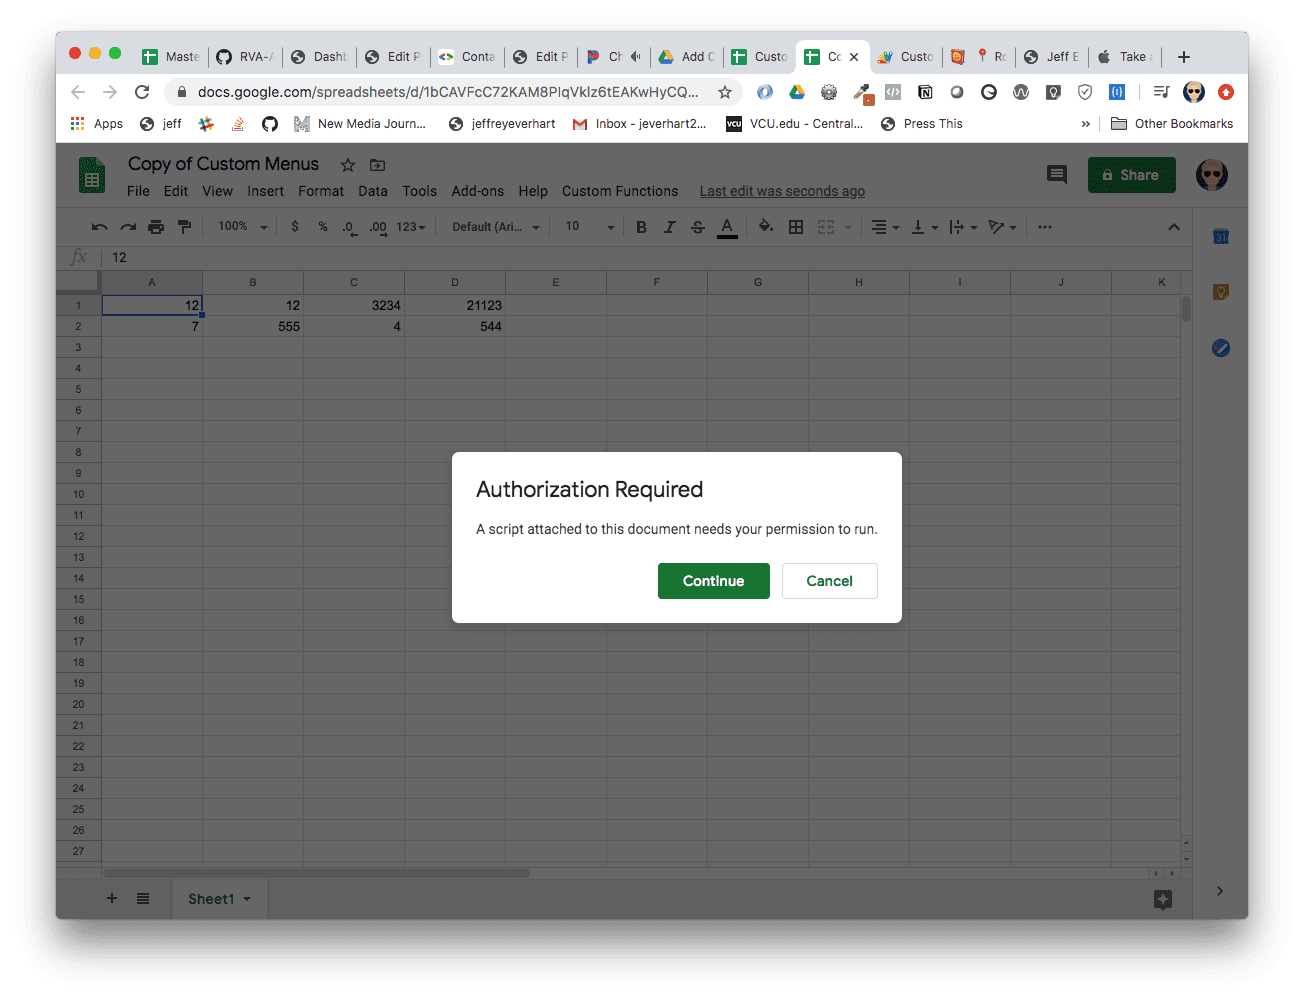
Each time you add menu items that interact with different Google Apps, you’ll be asked to authorize the application to perform those actions as a particular user.
If you click ‘Continue,’ you will be redirected through an OAuth flow wherein you’ll select a Google Account to proceed with. Then, if the add-on hasn’t been verified, Google will show a particular harsh security message about the app not being verified.
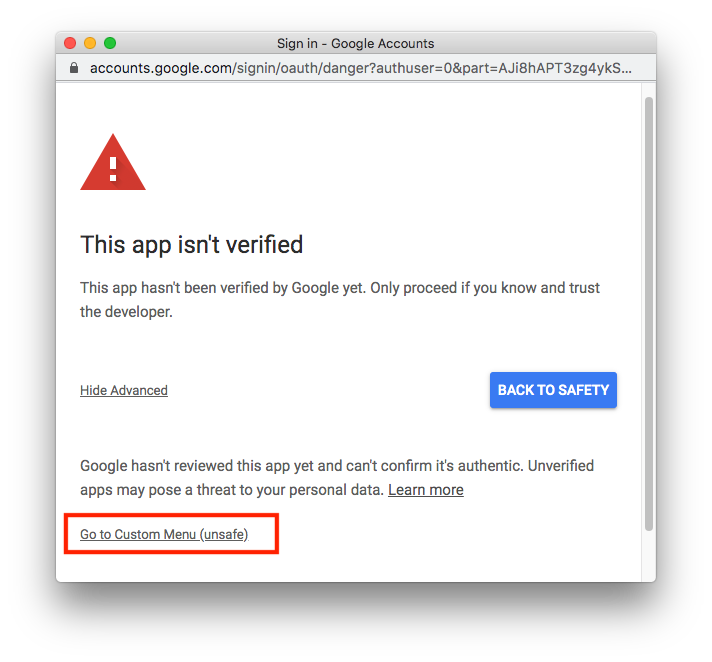
To get past this screen, we need to choose the “Go to Custom Menu (unsafe)” link in the bottom of that alert message. After clicking that message, we are then finally asked to verify that we want to give this script access to the resources it wants to use:
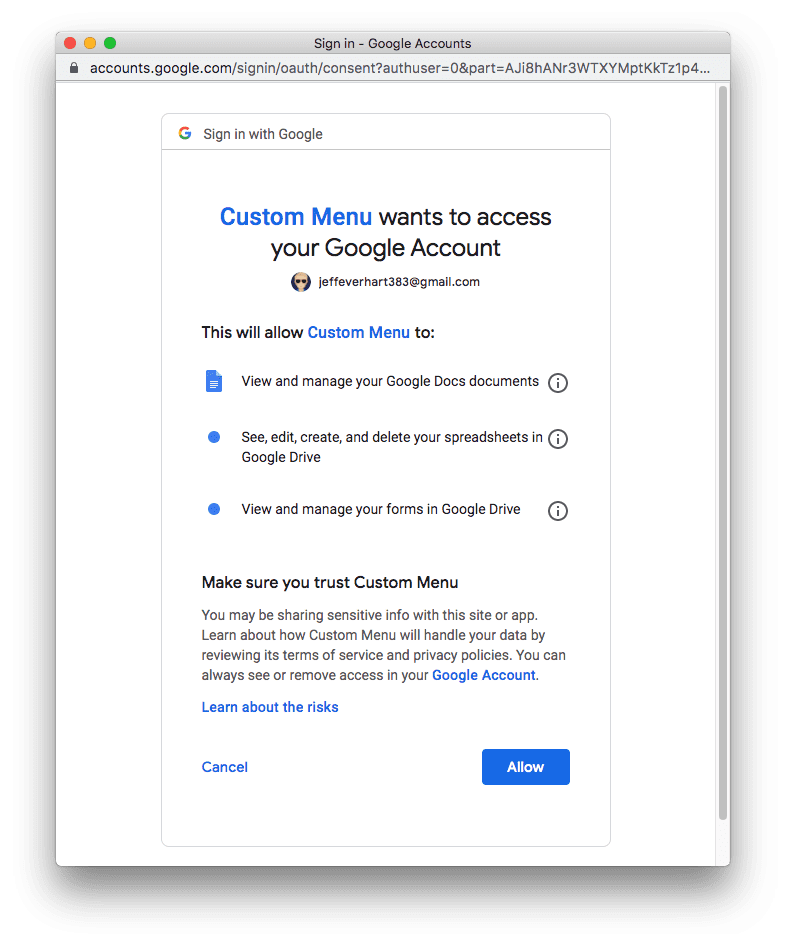
After doing all of that, we can finally run our two custom functions : )
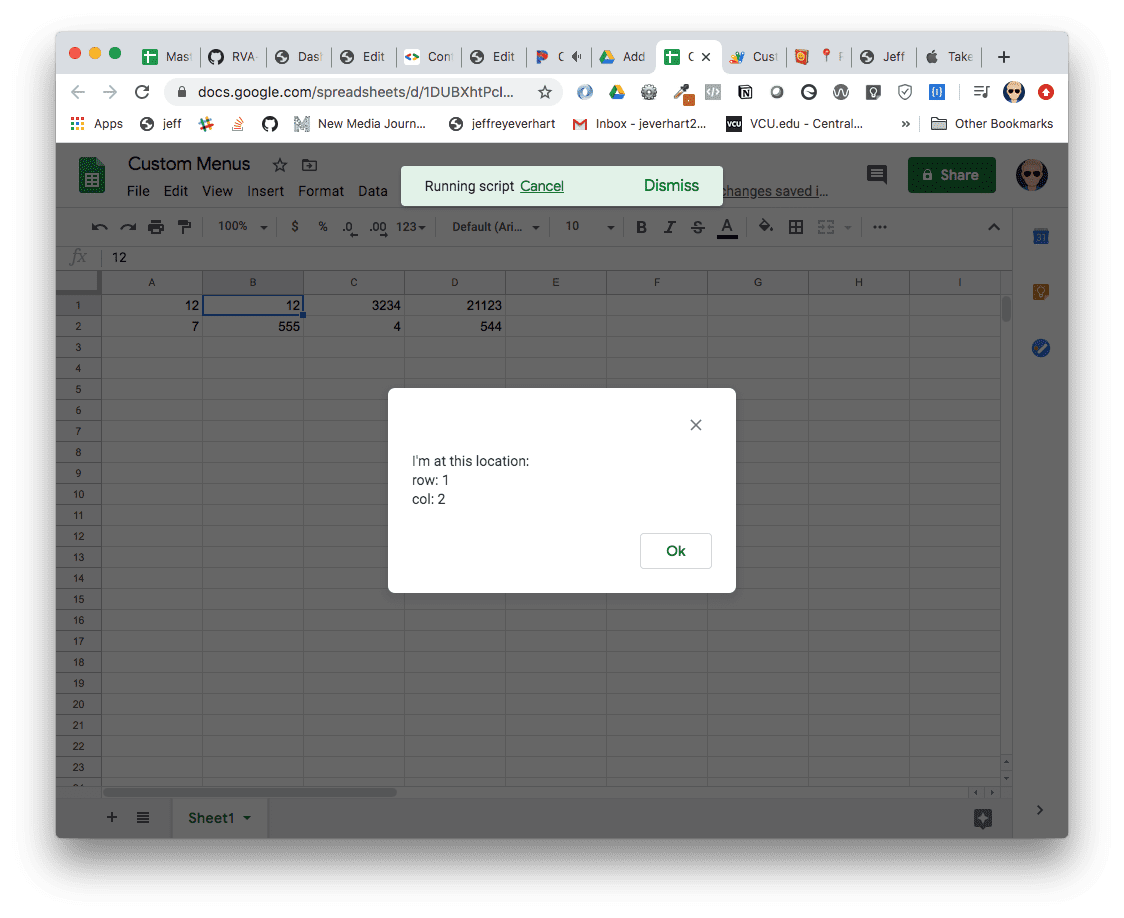
Running the ‘Get Range’ menu option creates an alert that give us the position of our cursor in the active spreadsheet, like a map pin of where we are :
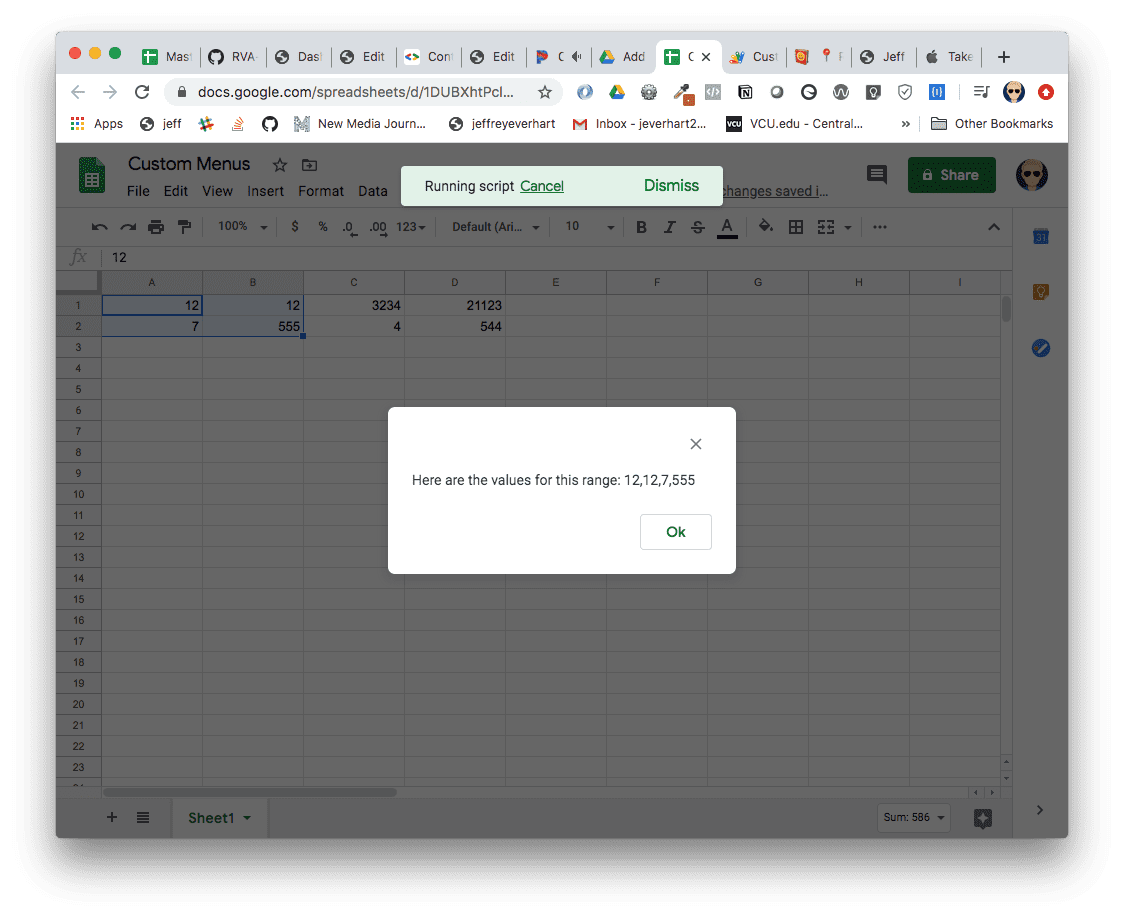
And, as expected our “Get Range Values” menu option creates an alert dialog of all of the values that we have currently selected using the cursor:
Thanks for your in depth tutorials! I am trying to build some advanced functions into my google spreadsheets, and now I have this problem:
I wish to have a different menu for different sheets in my spreadsheet.
Let’s say in my spreadsheet I have 2 sheets: NameOne and NameTwo, and only sheet “NameOne” should get the custom menu (so i can hide it from “NameTwo”
I tried this:
// Adds the custom menu to the active spreadsheet.
function onOpen() {
var spreadsheet = SpreadsheetApp.getActiveSpreadsheet();
Logger.log(spreadsheet.getName());
if (spreadsheet.getName() == ‘NameOne’){
var menuEntries = [
{
name: “Update”,
functionName: “syncSheetOne”
}
{
name: “Clear”,
functionName: “clearSheetOne”
}
];
spreadsheet.addMenu(‘Calendar Sync’, menuEntries);
}
}
This however does not work; and I would guess the reason is that the onOpen() function is not called when switching sheets, but is there a way to have different menu’s on different sheets? (within a spreadsheet)
I’m not sure whether or not that is “possible.” The way the code is written, it gets the whole spreadsheet and not an individual sheet. You could try using SpreadsheetApp.getActiveSheet() or some other method to get just the active sheet, but I’m not sure that would work. You could always just create two new menus, one for each of the options you wanted for the individual sheets.
I am using a Chromebook and it is saying this message:
Cannot call SpreadsheetApp.getUi() from this context. (line 4, file “Code”) what do I do?