The Google Fonts API makes it easy to load great fonts into your site for free. Beautiful typography can mean the difference between a good website and a great website. Instead of jumping through hoops to install beautiful fonts in your CSS, Google now provides a free service that lets you include open source fonts easily. The fonts are distributed using Google Fonts API, which is fast, reliable and tested. Check out the video below and the directions listed on this page to insert Google Fonts into your website.
1. Create HTML and CSS Files
First, you will need to create both HTML and CSS files to work with. Once you have created these files, make sure to link the CSS file to the <head> of the HTML file using the <link> element. After that, add a few heading and paragraph elements to the body of the HTML document so that we can play with them after we’ve loaded them from the Google Fonts API.
Click here to download the Google Fonts API Video Tutorial Files >>>>>
2. Explore the Google Fonts API Site and Choose Fonts
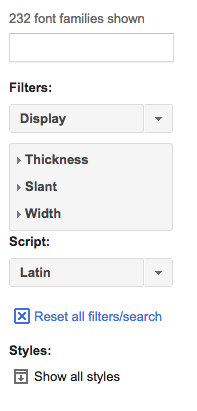
Once you have structured your HTML and CSS documents, head out to the Google Fonts site. Here we can sort through different fonts by style or other attributes like thickness, slant, and width.
When you find one or a few fonts that you want to include on the website, click on the blue “Add to Collection” button.

3. Package Your Google Fonts for Use
After you have added a few fonts to your collection, click on the “Use” button in the bottom right hand corner. This will take you to a separate screen where you can choose all of the different variations of fonts that you want included in your site. On the top right of that screen, a gauge with green, yellow and red sections will indicate how the inclusion of the fonts will impact page load time.
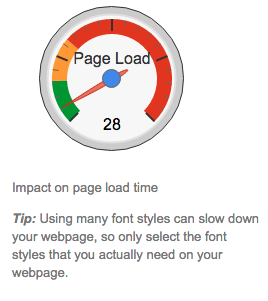
Keeping page load time low is important for all devices, but especially if you are designing anything used heavily on mobile devices. Each additional font or weight means extra data that is being sent to the device every time the page loads. Save your users some data and gain some SEO points for a quick page load by keeping additional styles to minimum.
4. Load Google Fonts
Once you have selected font variations you want, scroll to the bottom of the screen and copy the standard link code in the <head> of your HTML document. You want to make sure that this <link> appears before the link to your main.css file since the main.css will reference the fonts contained in the link we get from Google. Otherwise you custom CSS would load before the custom fonts.
<html>
<head>
<link href='http://fonts.googleapis.com/css?family=Droid+Sans|Merriweather|Rock+Salt|Comfortaa' rel='stylesheet' type='text/css'>
<link rel="stylesheet" type="text/css" href="style.css">


</head>
<body>
<header><h1>Google Fonts Example Site</h1></header>
<hr>
<h2 class="sans">Sans Serif Type</h2>
<article class="sans">
	<p>Lorem ipsum dolor sit amet, consectetur adipiscing elit. Donec massa purus, faucibus ac rhoncus in, suscipit vitae velit. Sed in suscipit elit. Fusce lobortis ligula elit, sit amet ornare ante faucibus sit amet. Duis sed rutrum erat. Maecenas nibh ante, tempor eget libero ut, ultricies viverra purus. Nulla facilisi. Morbi massa leo, dictum vel urna et, pretium pharetra libero. Aliquam placerat sed augue sit amet luctus. Nam mauris dolor, ornare at sollicitudin et, cursus bibendum metus. Curabitur maximus nunc eu ipsum ultrices, tristique vestibulum arcu congue. Suspendisse tincidunt laoreet metus a molestie. Praesent eu fringilla leo.</p>
</article>
<hr>
<h2 class="serif">Serif Type</h2>
<article class="serif">
	<p>Lorem ipsum dolor sit amet, consectetur adipiscing elit. Donec massa purus, faucibus ac rhoncus in, suscipit vitae velit. Sed in suscipit elit. Fusce lobortis ligula elit, sit amet ornare ante faucibus sit amet. Duis sed rutrum erat. Maecenas nibh ante, tempor eget libero ut, ultricies viverra purus. Nulla facilisi. Morbi massa leo, dictum vel urna et, pretium pharetra libero. Aliquam placerat sed augue sit amet luctus. Nam mauris dolor, ornare at sollicitudin et, cursus bibendum metus. Curabitur maximus nunc eu ipsum ultrices, tristique vestibulum arcu congue. Suspendisse tincidunt laoreet metus a molestie. Praesent eu fringilla leo.</p>
</article>
<hr>
<h2 class="handwriting">Handwriting Type</h2>
<article class="handwriting">
	<p>Lorem ipsum dolor sit amet, consectetur adipiscing elit. Donec massa purus, faucibus ac rhoncus in, suscipit vitae velit. Sed in suscipit elit. Fusce lobortis ligula elit, sit amet ornare ante faucibus sit amet. Duis sed rutrum erat. Maecenas nibh ante, tempor eget libero ut, ultricies viverra purus. Nulla facilisi. Morbi massa leo, dictum vel urna et, pretium pharetra libero. Aliquam placerat sed augue sit amet luctus. Nam mauris dolor, ornare at sollicitudin et, cursus bibendum metus. Curabitur maximus nunc eu ipsum ultrices, tristique vestibulum arcu congue. Suspendisse tincidunt laoreet metus a molestie. Praesent eu fringilla leo.</p>
</article>


</body>


</html>
See the Pen raobVd by Jeff Everhart (@JEverhart383) on CodePen.
Click here to download the project files used in the video >>>>>
5. Style HTML with CSS Rules
After you’ve copied the link from Google Fonts, it’s time to style some HTML with CSS. To do this easily, you can copy the CSS declarations for font-family directly from the Google Fonts API to include in our style.css file.
header {
	font-family: 'Comfortaa', cursive;
}

.sans {
	font-family: 'Droid Sans', sans-serif;

}

.serif {
	font-family: 'Merriweather', serif;

}

.handwriting {
	font-family: 'Rock Salt', cursive;
}
See the Pen raobVd by Jeff Everhart (@JEverhart383) on CodePen.
Go ahead and style some HTML headings using the fonts we’ve selected.
Post any questions you have in the comments! Happy coding!