I’ve been trying to up my sysadmin game over the last several months using a lot of different server configurations on AWS (Linux, IIS, etc.). Mainly I’m writing this post because I’ve implemented this server-side caching setup three times now, and every time I do, I end up having to go back to the drawing board to figure out what I did and how I did it.
I’ve already talked about a way to use NGINX as a proxy server, so this is just another way to make your server a bit fancy.
For those of you looking to improve the performance of your website or app, there are lots our routes you can take, and a lot of them have to do with the server environment.
Server-side Caching Explained
Sever-side caching really helps when you have any kind of page that takes a long time to generate and that doesn’t change very often. Here’s a diagram to illustrate the helpfulness of this technique.
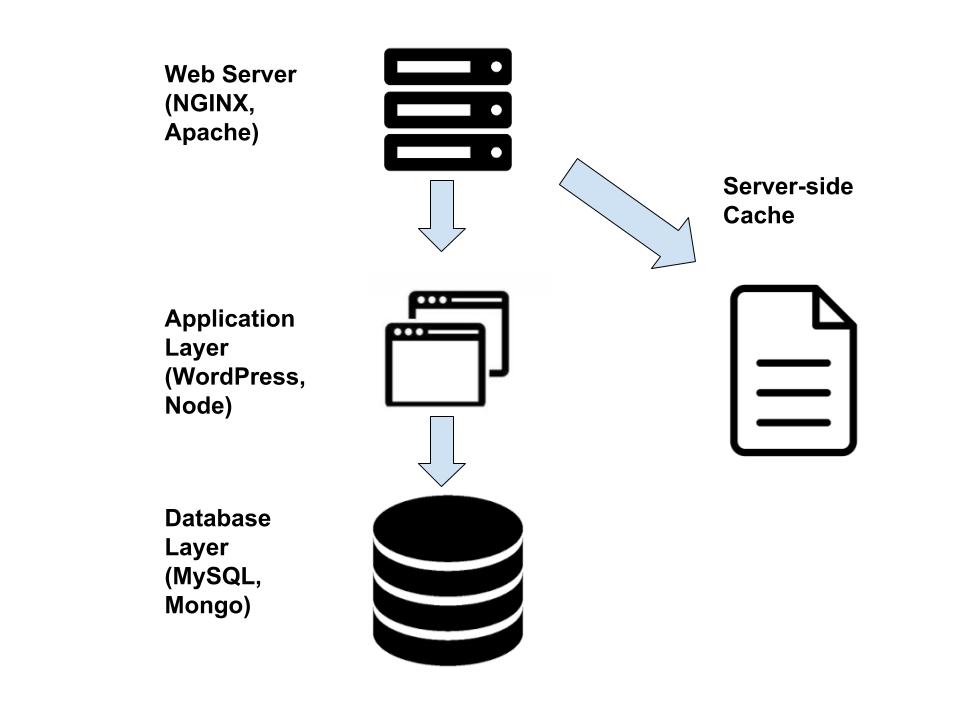
When someone makes a request to a webpage, it usually hits the web server first, and the server decides what to do with this request.
In most cases, it forwards the request along to some sort of application in the case of any kind of dynamic page.
The application, whether that is WordPress, Node, or any other framework, looks at the URL requested and then decides what to do.
In most cases, the application makes a call to the database, waits for that information, processes it using some sort of template and other logic, then returns the HTML content to the web server to send back to the browser.
It’s a bit nuts to think that this goes on for the the majority of pages you visit everyday, but that’s mostly the case nowadays. But, it’s easy to see how this paradigm could slow things down.
The Costs of Complexity
What if we need to make a series of calls to the database to get the needed data to assemble a page?
What if we need to make 15 calls, but we need to make them in succession, meaning we need the data from each call to populate the query for the next call?
What if we are fetching data from some external API and we want to ensure that our site responds with an appropriate 200 response even if the external service is down?
These are all great use cases for some sort of server-side cache.
A server-side cache is basically just a folder on the server that stores copies of files that have been requested. Then, when someone requests that file again, it just goes to the cache to get it instead of following the procedure outlined above to get it from the actual application.
For pages that are “expensive” to generate, this can make a huge difference.
Implementing a Server-side Cache with NGINX
There are several standalone technologies that provide caching support, such as memcache and Redis, but NGINX is a more-than-capable web cache on its own.
upstream nodejs {
    server 127.0.0.1:8081;
    keepalive 256;
}

# this line configures the cache and its settings
# path = the path to the folder you want used as a cache
# levels = how many levels deep you want the directory to grow to
# keys_zone = name for the cache and size
# max_size = max size for cache, default will grow to size of available space
# inactive = how long each cached resource can stay inactive before it will be requested and re-cached

proxy_cache_path /tmp/cache levels=1:2 keys_zone=my_cache:10m max_size=1g inactive=60m use_temp_path=off;

server {
    location / {

# this line instructs NGINX to use the key zone my_cache if there is a key in the cache for the
# requested resource

        proxy_cache my_cache;

# this line instructs NGINX to use the requested URI as the key for that file
        proxy_cache_key "$request_uri";

# this line instructs NGINX to cache any request where the application responds with a 200 OK status
        proxy_cache_valid 200 120m;

        proxy_pass  http://nodejs;
        proxy_set_header   Connection "";
        proxy_http_version 1.1;
        proxy_set_header        Host            $host;
        proxy_set_header        X-Real-IP   $remote_addr;
        proxy_set_header        X-Forwarded-For $proxy_add_x_forwarded_for;
    }
}-
This snippet should have enough comments for you to get something working, but there are lots of ways to fine tune this thing once you have a better understanding of the requirements.
Here are just a few resources I used to get this thing working: