Over the past few years, this site has gone through some pretty substantial changes. After getting hacked on BlueHost sometime in 2016, I reworked the entire site architecture using hand-rolled resources on AWS. While this taught me a lot, it has been increasingly expensive and time-consuming.
To keep my costs down, I’m really relying on some of the smallest hardware that AWS provides. When I made the call to switch, I figured it would be awhile before I outgrew my current setup, but as a result of a doubled-down focus on creating more blog content, my monthly traffic has increased a little more than 3X in the last year.
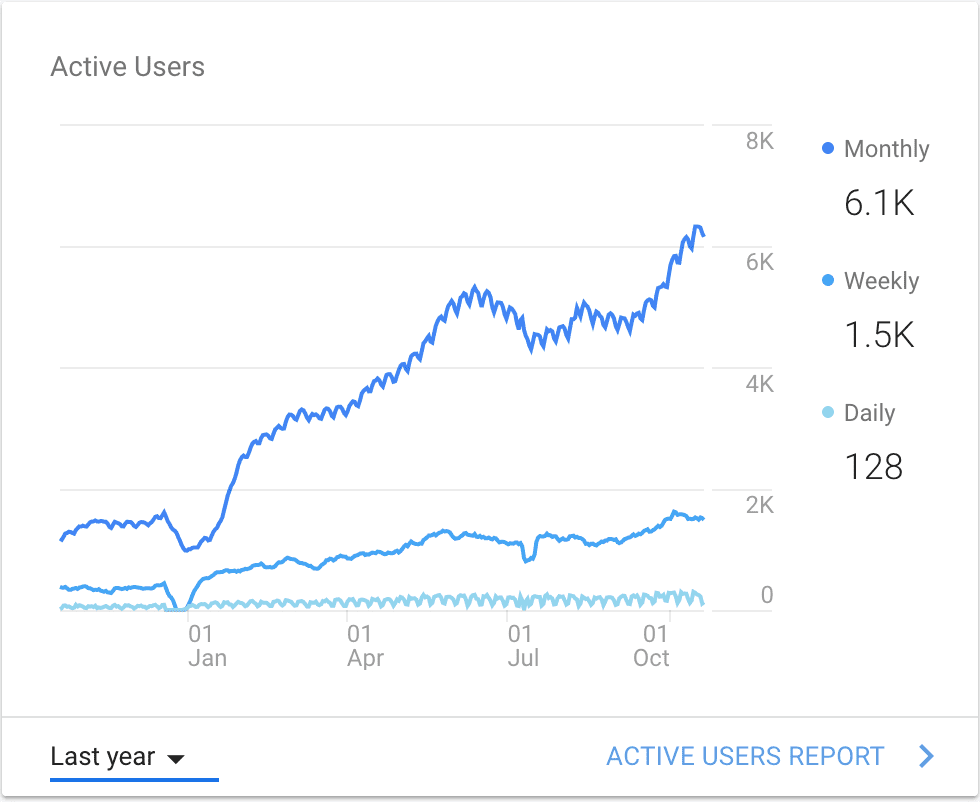
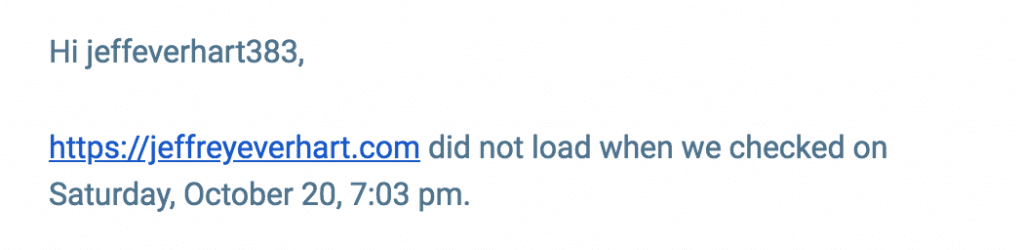
While this is a great thing all around, it also provides some pretty significant challenges given my desire to focus my development time and efforts on things other than this site. I would say I live in pretty constant fear of my server going down, which it tends to do at least once every two weeks or so. Luckily, Jetpack lets me know, I restart Apache, and things return to normal until Apache processes spawn out of control again.
You can even see some of these craters in my traffic where I may have taken a little while to get everything running again.
Obviously, this is an issue for anyone claiming to be a web developer. I know there are likely a lot of things I could do to performance tune Apache to handle this, or I could switch wholesale to something like NGINX, but I figured since it is 2018 at the time of writing this post, my stuff should really be in a CDN of some kind.
So, to partly solve my server issues and add another AWS tool to my tool belt, this post will be a step-by-step guide to setting up a CloudFront distribution for my WordPress site.
Change Roadmap: Adding a CDN
So, before we start changing stuff, it worth taking a quick overview of what we have now and what we will change as we add in CloudFront.
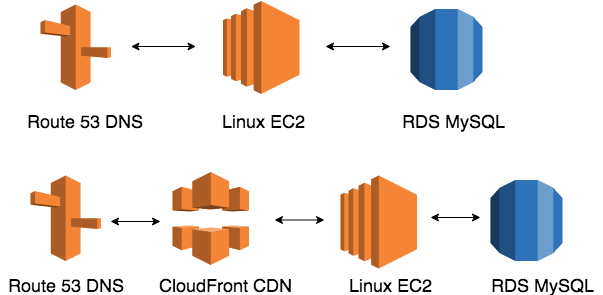
All of the DNS management for this domain is done using Route 53, so the DNS talks directly to an application server hosted on a Linux EC2 instance running WordPress. The MySQL database is decoupled from the server using the RDS service. Pretty standard LAMP stack.
In the new configuration, we’ll place a CloudFront distribution in between the DNS and the application server. All requests for content from the DNS will hit the CloudFront CDN first and serve a copy of that content until it needs to pull content from the application server as it becomes new or something has changed.
Since most of my content changes little after publication, aside from the occasional comment, this should greatly reduce the amount of load my server experiences at any one time. In theory, this will also offer the base for some pretty significant performance gains down the road. Since there are CloudFront caches around the world, my readers will always get the closest copy of the content.
So, let’s get started.
Creating a CloudFront Distribution
First, we’ll need to create a distribution in CloudFront. Basically, we can consider a distribution as a bundle of files pulled from our server, or our origin, that are stored in edge locations around the world.
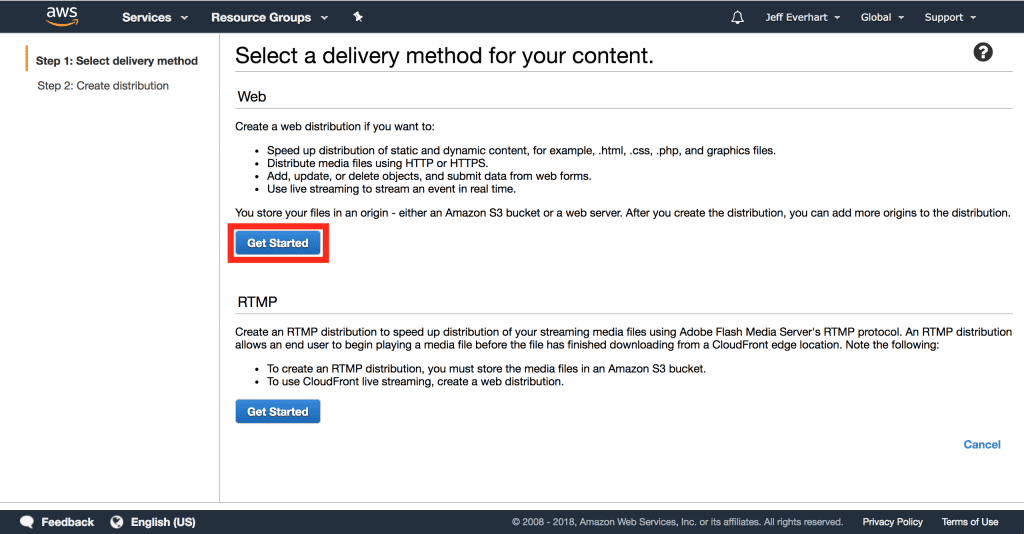
After navigating to the CloudFront service menu in the AWS console, we’ll go ahead and create a distribution.
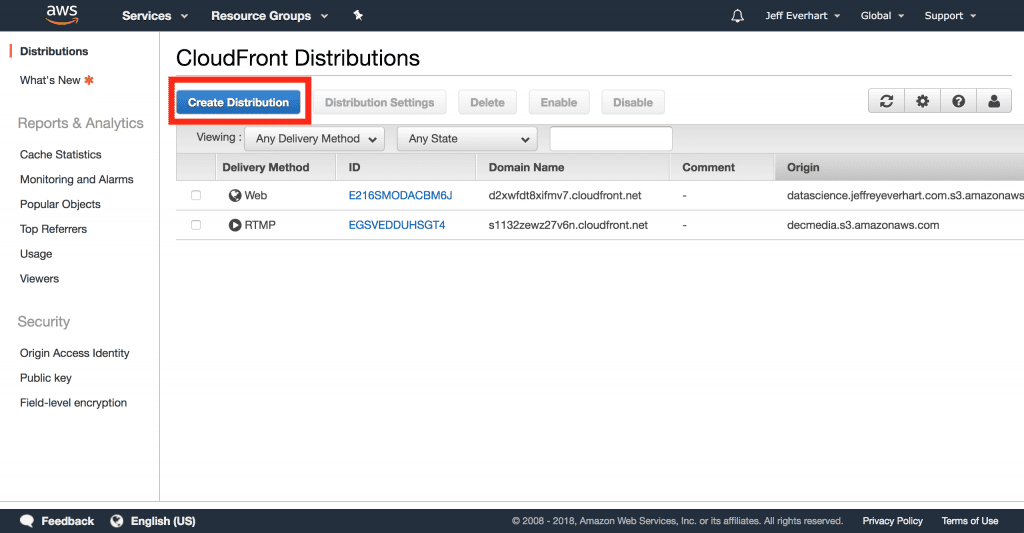
From here, we’ll need to decide between the two types of possible distributions: Web and RTMP. Since we’re serving a website site, Web will be our natural choice here:
Once we’ve selected the type of distribution, we’ll need to tell the distribution where our origin is and how to configure some additional basic settings. While configuring the distribution, we can define how the cache will behave at a default level, but we can and will come back later to override this default behavior at specific paths.
Setting a Content Origin
The first step in creating our CDN involves telling the CloudFront distribution where to pull our content from. The terminology AWS uses here is origin, so that is what I’ll use from here on out.
Origin Domain Name
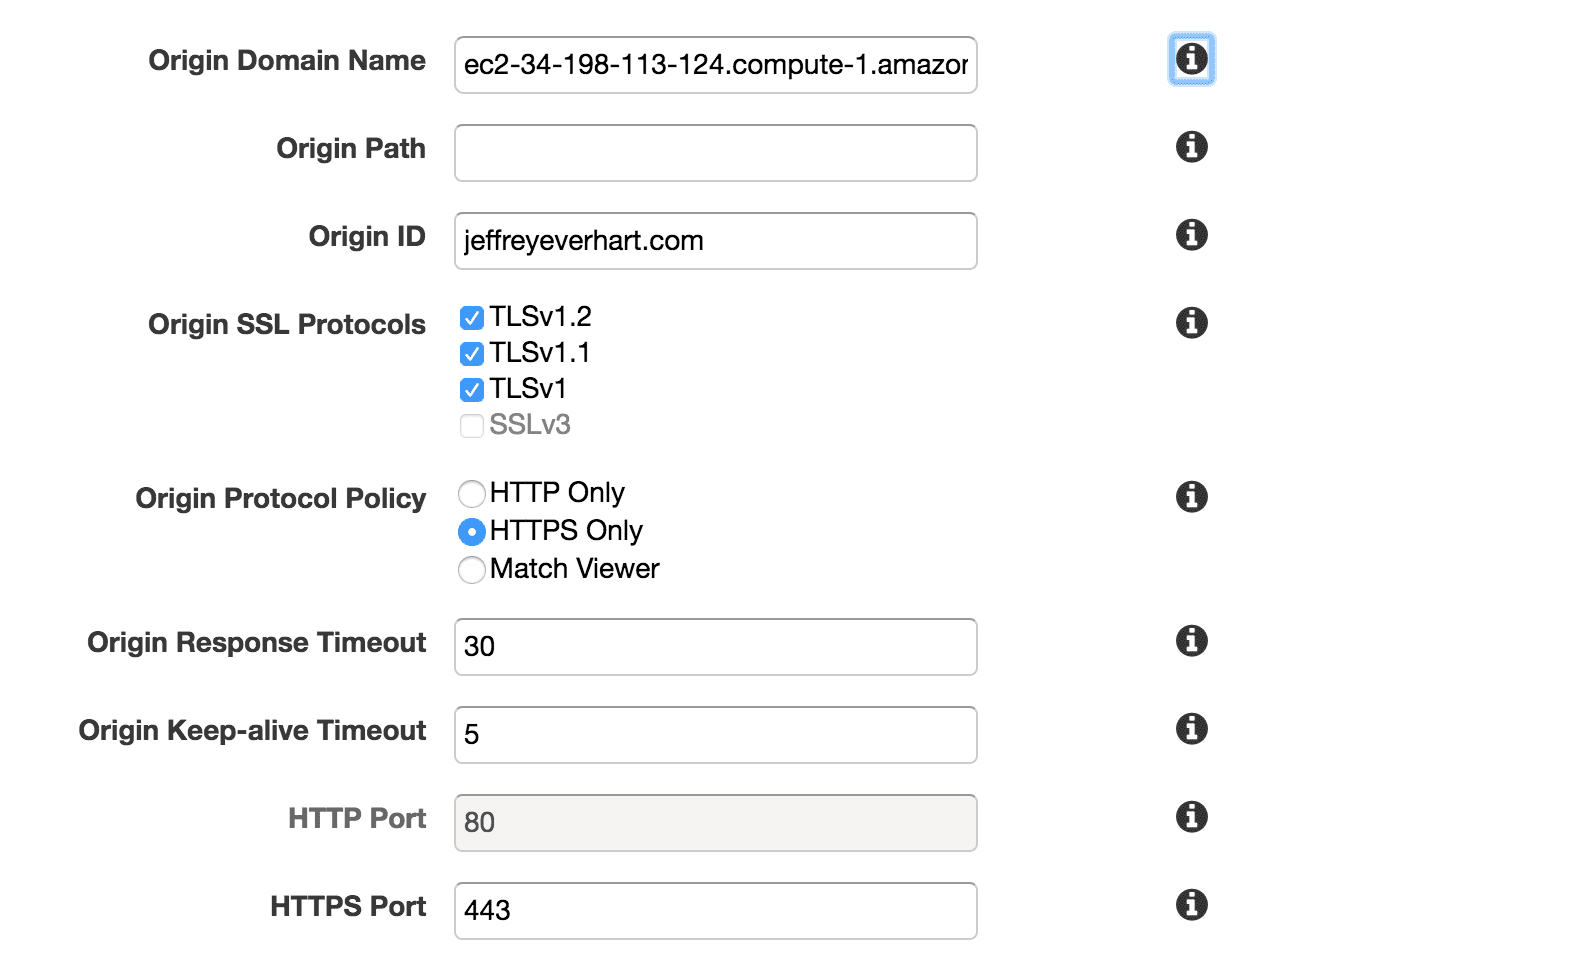
First, we need to set the origin domain name, which is essentially the server or store that CloudFront will pull from when someone hits your CDN. It’s important to note that this origin cannot be an IP address, as I learned on my first way through this process.
I specified the public DNS of my EC2 instance, but you could also pull from load balancers or S3 buckets. I also just used the name of my site as the Origin ID.
SSL and Protocols
For the SSL protocols, I pretty much left things as a default, but for the origin protocol policy, I set it to use HTTPS only, which also activated the 443 port by default. That means that CloudFront will only communicate with my origin using HTTPS, which means that all traffic to and from my site will be encrypted.
Timeouts and Keep-alive
Again, I just left these as the sensible defaults here. This deals with how CloudFront will handle requests to your origin should something go wrong on your server. In the future, I’m going to experiment with the keep-alive timeout number to speed up my requests to the /wp-admin path, but that will be a future blog post.
Ports
For this, I was able to leave the defaults set, but that is because my server is configured to responded to HTTPS requests over port 443. Since I’ve decided to have CloudFront redirect all HTTP requests to HTTPS, nothing will ever actually hit port 80.
Managing HTTP Connections
In addition to the options above, we can also specify how CloudFront will handle different HTTP methods and headers.
Viewer Protocol Policy
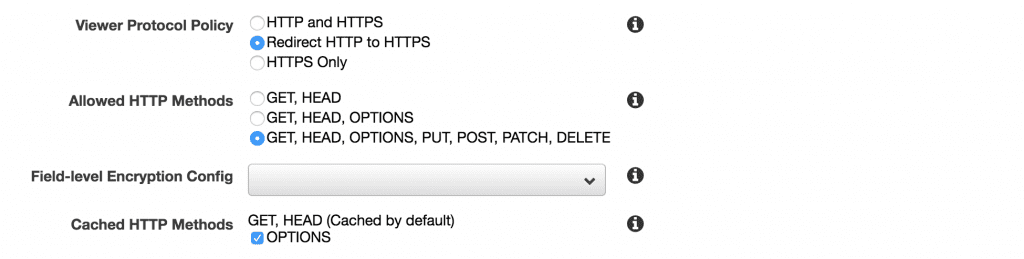
The first things we get to configure is our viewer protocol policy, which determines how your users will connect to CloudFront. Obviously, using HTTPS will require you to configure an SSL certificate, which we will do later.
The HTTP and HTTPS option will allow your user the option of using either protocol, while the redirect option will redirect all HTTP requests to the HTTPS version of the URL. Since this is the default behavior on my Apache server, I decided to keep this setting for CloudFront as well.
HTTPS only on the other hand will only allow your users to connect if they type https:// into the browser address bar. In my opinion, I can’t really see a huge reason to ever use this option.
Allowed HTTP Methods
Since WordPress is a dynamic web application and content management system, it’s really best allow all HTTP methods on your origin, as that is the only setting that will allow you to create or update any content, login, or do anything else that would require a POST request.
Since the results of GET and HEAD methods are already cached by default, I also turned on the caching of OPTIONS requests, which should speed up any CORS requests made to the WP API.
HTTP Headers
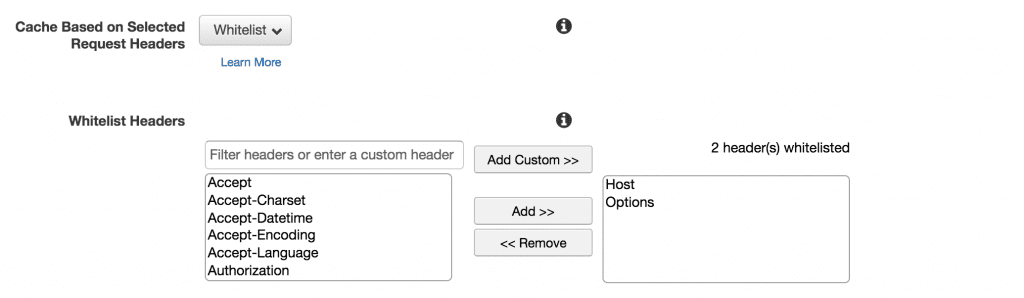
When it comes to HTTP headers, the ideal scenario is to cache content on the fewest number of headers we need to make our application function. Some of the articles I consulted for this project recommend caching based on the Host and Options headers at a minimum, so we can go ahead and set this as our default.
As we adjust our rules for other paths, particularly content in /wp-admin, we’ll need to add some additional whitelisted headers here to make things work appropriately.
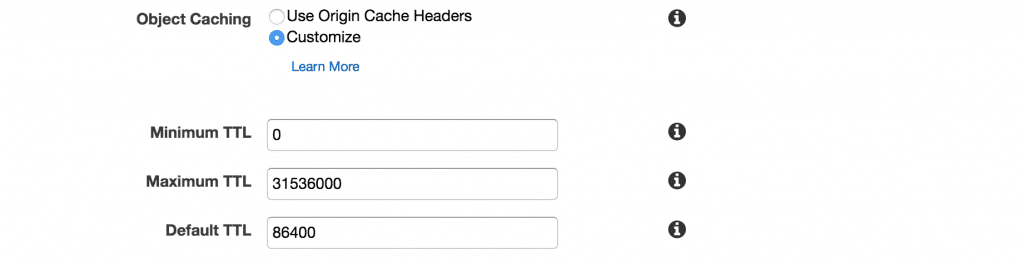
Object Caching
With the object caching settings, we can set the cache control headers for all of the resources served by our CloudFront distribution. Here we have two options. First, we can just allow the resource served by CloudFront to inherit the save cache headers sent by your origin server. Second, we can have CloudFront set custom headers on all of our objects.
WordPress decides to offload most of the caching configuration to plugins according to their docs on optimization, so we’ll go ahead and specify our own custom rules as a default.
Cookies
Since WordPress is a PHP-based web application, it makes extensive use of cookies to manage the session state of users. Therefore, if we expect to use our WordPress site to its full extent, we need to add support for cookies.
However, since most of your readers won’t be authenticated in any capacity, the majority of your users will all receive the same cached copy of your content. Again, as with the HTTP Headers, instead of forwarding all cookies, we’ll create a whitelist with only the cookies WordPress sets and needs to operate.
There is a little bit of information about the cookies WordPress uses in these docs, but I had to play around a bit to get everything working. If in doubt, open up the dev tools application panel and you can look at all of the cookies that are set every time you log in or browse your site.

In the end, I may have been too aggressive here, but I’d rather have every piece of functionality work at 100% and make a few more trips to the origin, but that is a trade-off I’m OK with. Again, I made some additional modifications to the /wp-admin/* path in behaviors to pass all cookies since I think caching objects in the dashboard is likely a no-no. More details on that later.
Query Strings
There are lots of places where WordPress will use query strings in the URL, so we need to instruct CloudFront how to handle those as well. Obviously, not forwarding query strings offer the best performance, but that’s not realistic given our application.
We also have the option of creating a query string whitelist like we did with the HTTP headers and cookies, but in this case since we want all of our posts, pages, and attachments available at both the permalink and raw URL variants, its better to forward all of the query strings and cache each unique combination.
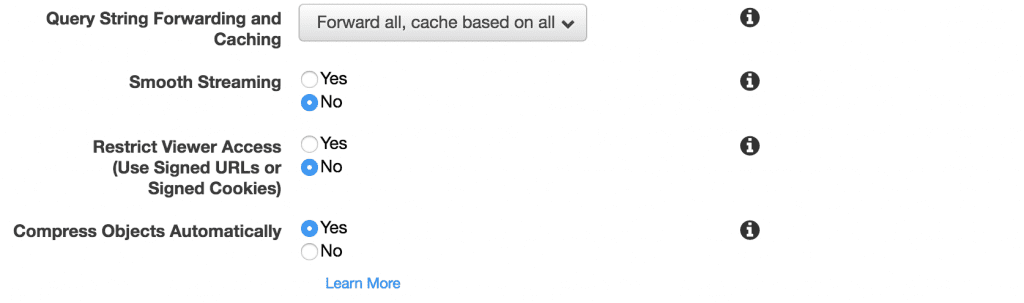
In addition, turning on the ‘Compress Objects Automatically’ will allow us to serve gzipped files when the browser will accept them, giving us an additional performance boost.
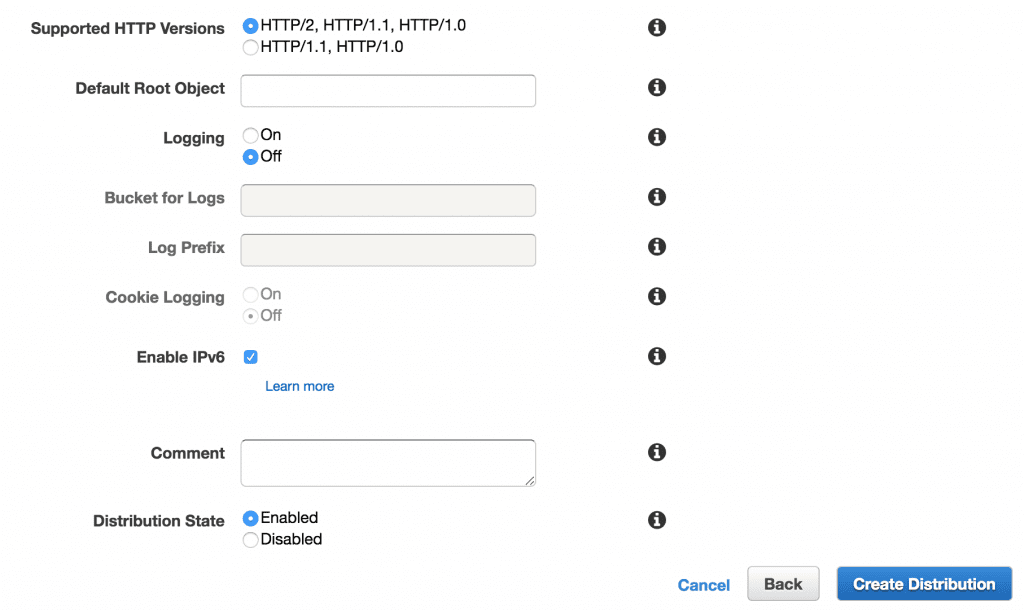
Default Distribution Settings
In addition to all of the settings above that we can specify about our default path, there are lots of options that we can configure for the distribution as a whole. Some of these things are larger concepts which may warrant their own articles in the future, so if you have any questions, just let me know.

Price Class
One of the things that CloudFront lets you configure is which edge locations to use to store your distributions. An edge location is essentially a data center that stores a copy of your content, and CloudFront is smart enough to serve the user the closest copy of content geographically, which is what allows for the extremely low latency associated with CloudFront.
There are a few configurations, but I configured my distribution to use all edge locations, which is slightly more expensive but more performant. Since I have lots of traffic from India and South America, this makes sense to me. If you are a US-based business or only serve a particular geographic area, then it may make sense to only use a subset of the available edge locations.
AWS WAF
AWS WAF stands for Web Application Firewall, which is a service that allows you to specify rules to block common attacks like SQL injections or cross-site scripting (XSS). Maybe one day I will add this to the stack as well, but I’m sure configuring this service could become a blog post on its own.
Alternate Domain Names
This option exists for distributions that will be served using a custom domain. Each CloudFront distribution gets its own publicly addressable domain name, but if we wan’t to tie our distribution to a domain name we own, we need to include all of the variations of the domain name we’ll use in this text box.
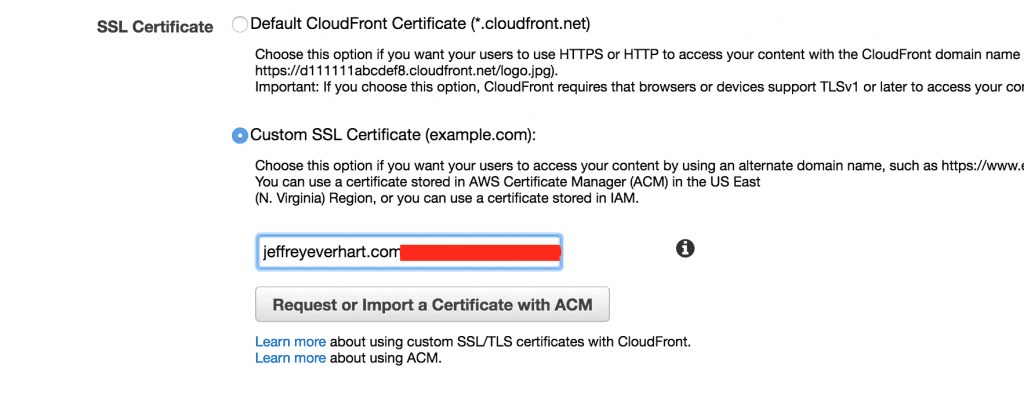
SSL Certificate
If you decide to make your distribution accessible over HTTPS, you need to configure the SSL certificate that will be used to encrypt that traffic.
Additional Configuration Details
As far as I’m concerned, none of the following details are super important to cover. In my case, and in most cases, I think you’d be fine leaving these as the AWS defaults. If all of this stuff looks good to you, go ahead and click ‘Create Distribution’ to finish off this portion of the process.
Creating Behaviors for CloudFront Distributions
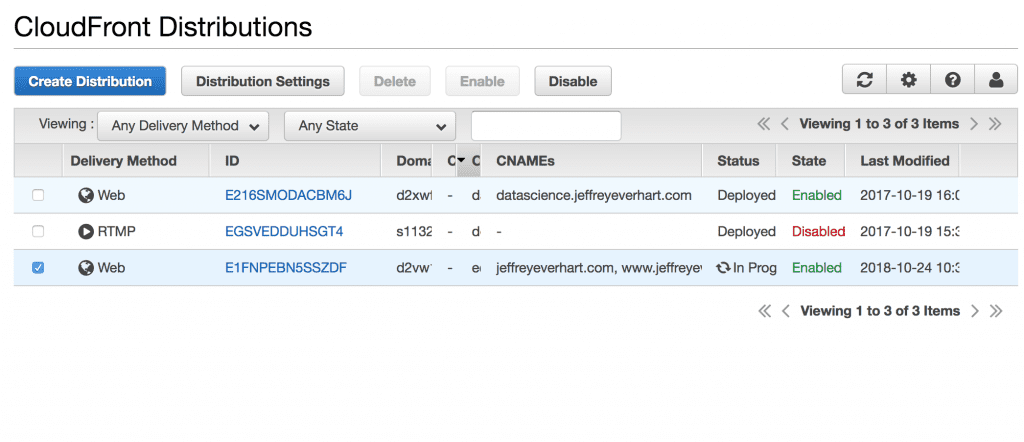
Ok, so at this point, you should be redirected to the CloudFront Distributions menu where you can see all of your distributions and their statuses. Under the CNAME row, we can see any DNS names associated with our distribution, and the status can tell us when the distribution has been pulled into all of the edge locations.
Now that we have our distribution created, we want to alter our distributions behavior at different paths. For example, the content served at the index of your site and the content served anywhere in /wp-admin require two different configurations.
We want CloudFront to heavily cache the content our readers will request, while providing us uncached copies of our admin pages. In practicality, this typically means that CloudFront will end up requesting most of the wp-admin content from our origin server.
To add a behavior to our distribution, click into the distribution we just created to access some additional options. From here you should see a tab for ‘Behaviors,’ which should show at least the default behavior we created when we created the distribution. 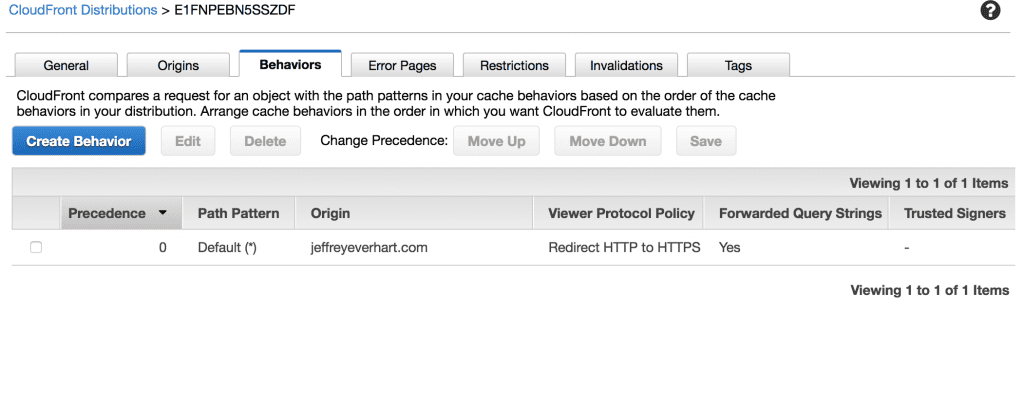
Click ‘Create Behavior’ and add the path you want to create the behavior for. You will also be asked to specify an origin, which in this case is the same server everything else is on. But, looking forward, this would let you do some cool things like offload static content to S3 or add other AWS services as possible origins.

For each behavior we create, we’ll have the opportunity to configure a subset of the options we did for our default behavior. Since all of my /wp-includes and /wp-content files are on my origin, I only needed to create the following behaviors to get everything working:
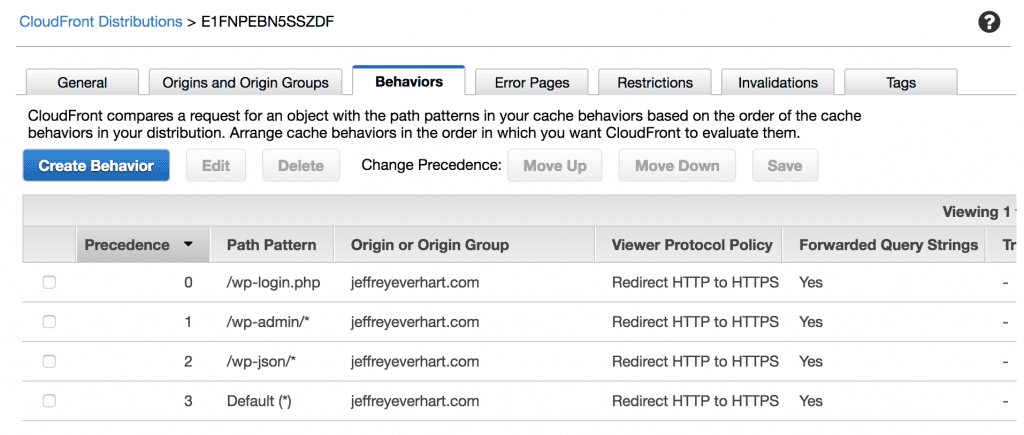
There is a lot of overlap in the configurations for these three different paths, so instead of outlining everything, I’ll only highlight the differences and explain why they are import in the context of WordPress.
/wp-login.php
Since wp-login.php is the default login page for most sites, we just want to make sure that the browser doesn’t cache a version of this page, so instead of allowing CloudFront to set cache control headers, we use the headers set by the origin server instead.
| Setting | Value |
|---|---|
| Object Caching | Use Origin Cache Headers |
| Whitelist Cookies | comment_author_* comment_author_email_* comment_author_url_* wordpress_* wordpress_logged_in_* wordpress_sec_* wordpress_test_cookie wp-settings-* |
/wp-admin/*
For this path, I took a slightly more aggressive path than some of the other tutorials I read. What I’m doing here is choosing to value consistency over performance for the admin dashboard by forwarding all cookies instead of just a whitelist.
While it may not matter in the long run, my usage of my site’s admin area is low in comparison to the rest of my traffic, so this seems like a pretty reasonable trade-off.
For the additional headers, like Referer and User-Agent, I added these after some initial things went wrong.
First, it seems like the wp-json endpoint and admin-ajax.php both needed the Referer header present to communicate with the backend. This solved some initial issues uploading media.
Second, a recognizable User-Agent header seems to be a requirement for the visual editor to display, as per this thread. CloudFront can pass its own UA headers, but they are not standard. CloudFront also griped because I added this since its many possible values meant basically no caching, but since this is just the dashboard that I access from one machine, I’m fine with that.
| Setting | Value |
|---|---|
| Object Caching | Use Origin Cache Headers |
| Whitelist Headers | Host Options Referer User-Agent |
| Foward Cookies | All |
/wp-json/*
The only real difference for this path is the addition of the ‘Referer’ header. I uncovered this after receiving some error messages when trying to load and save posts with the Gutenberg editor, since it does all of those transaction via the REST API. It seems like adding the ‘Referer’ header calmed that down, but I expect some additional changes to this path after I start using Gutenberg full-time.
| Setting | Value |
|---|---|
| Object Caching | Use Origin Cache Headers |
| Whitelist Headers | Host Options Referer |
| Foward Cookies | All |
Cutting Over to CloudFront
Once you have all of the distribution and behavior settings in place, the last step is to test and actually make the DNS cutover to point your domain records at the new CloudFront url.
If you want to do some testing, the best way is to get the IP Address of the CloudFront distribution using some method on the command line (i.e. curl, ping, or dig):
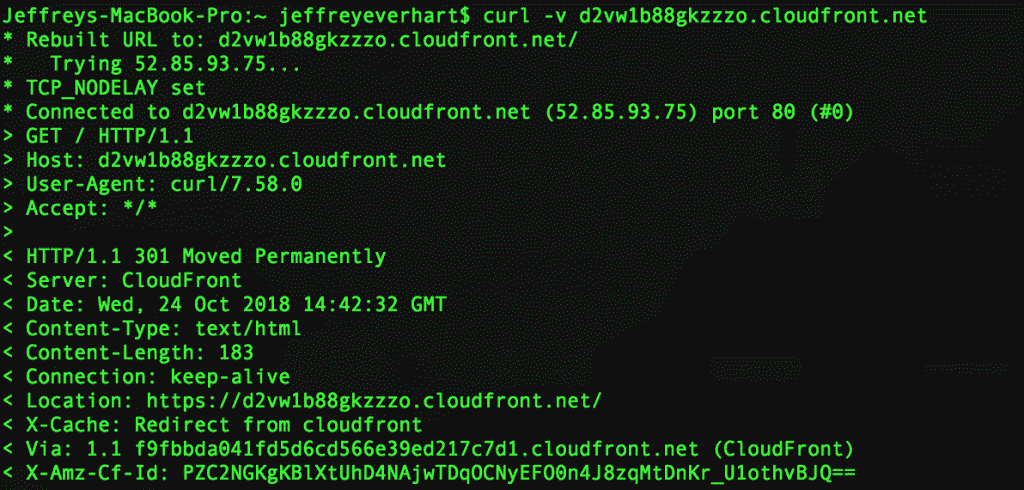
From here, you can change your hosts file so that your chosen domain name resolves to this IP Address on your local machine. Once you do that, you can browse your site using you full domain name and do some testing. I’d recommend testing out both the front end and the back end, including all admin areas and plugin pages that are important to your site.
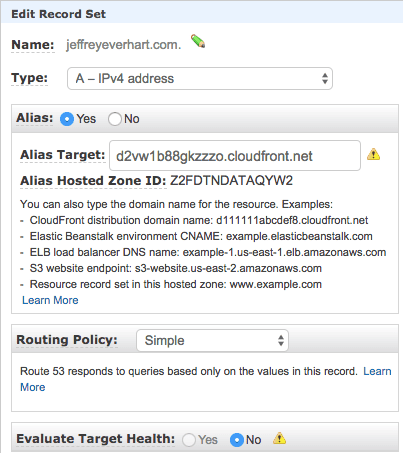
If everything looks good, you can update your actual DNS records. Since DNS registrars differ, there are lots of places where this step will differ for different people.
Since my records are located in AWS Route53, they make it simple by allowing me to just alias my A record to the CloudFront distribution.
Wrapping Up
Overall, this process took me a few days or research and a few days to implement working very intermittently. If you were determined and know a little bit about the cloud and networking, this is easily something that could be accomplished in a few hours.
While I’m still only a few weeks out from the change, I can say nothing but good things about my decision. Everything seems to be working for me, my pages are loading faster when not logged in, and most importantly, the load on my tiny server is almost non-existent at this point.
Overall, I estimate the cost difference for adding CloudFront to be at a maximum of $5 a month, which is really impressive considering what my additional costs would be to reserve more hardware.
I’d be remiss if I didn’t mention a few other posts I used as a reference to get this far. You’ll find that a lot of what appears here is a recap of these other sources, some of them are a bit dated in the tech world, and WordPress has evolved a lot since 2015 or even 2017. Thus, I was left to figure out some of the REST API settings on my own using the rest of the wider internet:
- How to accelerate your WordPress site with Amazon CloudFront
- Setting up WordPress behind Amazon CloudFront
How much faster your pages loaded after moving to CloudFront, and also how much the CPU usage of the ec2 instance went down?
It does a full page cache?
It took about a full second off the full page load, but the time to first byte went down substantially, so initial html now renders almost instantly. I wouldn’t say the average CPU went down a ton, but I’ve had no crashes since switching. My issue on the t2.micro instance was never sustained high load, but high load when 10+ connections would be on the site at the same time. The EC2 instance is now low at all times. Yes, it does a full page cache, so whatever an origin responds with for a given path, that is what will be cached. Overall highly recommend doing this if you are on AWS. Thanks for reading!
Specifically with WP, the described implementation method hides some drawbacks that can impose [potentially substantial] maintenance overheads. I’ll describe the major three:
1. When installing WP plugins, you need to understand the way it works, and adjust the distribution’s behavior accordingly.
2. When updating WP and/or Plugins and/or theme versions, you need to keep track of changes, and make sure your distribution’s behavior adhere to it.
3. Having your server as the origin means that in the event of loosing the server, you’ll also loose all files. As a consequence, when you restore your server from your last backup, you might end up with a WP site that is missing files referred to by the DB records (for example: you created a new post with images, but your last backup is prior to that post’s creation time. Assuming your DB runs on RDS, it will hold the records to that post, but your backup won’t have the images. Same goes with plugins installation). So you’ll probably need to implement EFS for files, and have the server mount it upon starting.
There a few more attention points…
The method this post describes is totally doable. That said, you need to consider the maintenance overheads.
Thanks, Amit. Yes, those are all valid concerns. I have had conflicts with a few plugins that no longer work the way they are expected to, i.e. Wordfence, but that may be due to the added network layer that CloudFront introduces. I think it goes without saying that adding functionality, especially functionality that occurs outside of the /wp-admin or REST API paths, necessitates a revision of distribution behaviors. For #3, I’m not sure that downside is specific to using CloudFront. Seems like that could happen with a single-instance installation just using built-in page caching for NGINX. As you note though, using some sort of file system abstraction like EBS or EFS would help alleviate that. I think most EC2 instances try to enforce that convention by default, so it isn’t something I decided to go into detail about here.
Another maintenance headache in regards to the set-up I outlined is renewing SSL certs for end-to-end HTTPS. At one point I had an SSL certificate expire on the origin and block CloudFront from connecting with it. Might simplify things a bit to terminate SSL at CloudFront.
Either way, thanks for reaching out with the comment! Thanks for reading, JE
Thanks for your sharing.
I notice that you are using EC2 which is expensive. Have a look at AWS Lightsail, it only needs 10$ (or even 5$) a month.
Thanks for reading! I’ve looked at Lightsail, but don’t see a ton of benefit in switching. I use EC2 reserved instances, which brings the cost of a t2.micro instance to around $5 a month anyway. You agree to buy a year worth of time, but I typically have a few small servers running at any one time, so I go through that every few months and then just buy more reserved time. Not sure if Reserved Instances would give you any benefit, but might be worth checking out if you haven’t. Thanks again for reading and commenting! Regards, JE
oops, didn’t know about Reserved Instances, the discount rate seems great! Thanks for your info!
The setup you just explained will not work.
What you did is to create the cloudfront distribution which you set to have origin as domain.com. At the end you then set domain.com to have Alias record as distribution.cloudfront.net so you created a loop:
Browser -> domain.com -> distribution.cloudfront.net -> domain.com -> etc
The logic you used is bad
Hey George,
Thanks for reading. There is a paragraph about setting the origin with a screenshot that shows me using the EC2 public DNS as the Origin Domain Name:
I chose to use my domain name as the ID for the origin, but that has nothing to do with where the distribution is pointed. I can assure you this setup works as it’s almost certain that your page view was served by CloudFront 🙂 This is a long post though, and one that I worked on for a few weeks, so if there is some other language elsewhere in the post that would have led you believe a loop was being made, can you post a snippet here so I can correct it for future readers.
Thanks for reading and commenting,
Jeff
its not working wordpress straight redirecting its original domain name then how we can use cloudfront
Where are your DNS records pointed? The should be pointed at cloudfront, and cloudfront should pull from the origin server.
I tried and followed the steps. The only option that I changed is
used Default CloudFront Certificate (*.cloudfront.net)
Now, When I tested by changing hosts file, I am getting ‘SSL_ERROR_BAD_CERT_DOMAIN’ for most of my resources.
Note: I am using cache plugins.
That is because the name on the cert, which is some subdomain of cloudfront (*.cloudfront.net), does not match the domain you are using to connect via the hosts file, which I assume is some custom top level domain. You will need to use the AWS certificate manager to generate an SSL certificate for the domain that you want to use.
I did, Now I am getting
SSL_ERROR_NO_CYPHER_OVERLAP in firefox
ERR_SSL_VERSION_OR_CIPHER_MISMATCH in Chrome
I have posted it on Stackoverflow, with more detail
https://stackoverflow.com/questions/59588356/configuring-cloudfront-with-wordpress-gives-ssl-error-no-cypher-overlap-error
Oh man, sorry it’s being such a pain for you. I’m not 100% percent positive why you would get that error, but thanks for posting the additional details in StackOverflow. I’m not sure if you found these already, but there are a ton of suggestions on how to troubleshoot that error here by Kinsta. Given the content of the browser error messages, I’d suggest using the tools they have for checking the validity of the cert and look for name mismatches. Flushing the SSL cache as they suggest might not be a bad idea either.
I revisited my own CloudFront settings and noticed some differences between what I have and what you have. None of these seem likely to help solve the issue, but I figured the more info you have the better:
Here are my settings:
Origin Protocol Policy: Match Viewer (My origin will redirect to HTTPS anyway, so not sure this matters)
Minimum Origin SSL Protocol: TLSv1
Alternate Domain Names: I have both www subdomain and non-www domain here comma separated
I’d also be interested to know the specifics of the 504 error you mention. I frequently receive 504 errors when CloudFront can’t connect to the distribution. Also, just to note, my WP set-up is pretty bare bones (Linux, Apache, PHP), so there is no type of cPanel handling anything, so that could be a potential point of failure. Feel free to update this thread if you figure it our or want some additional eyes on the situation as your work through it. Best of luck, Jeff
Thanks for help. Your reply helped me and I was able to solve. So below is detail
I was adding cdn.mydomain.tld as alternate domain name. I also tried http://www.mydomain.tld. But didn’t worked. This is due to SSL i have on my site is for mydomain.tld and http://www.mydomain.tld.. no wildcard SSL.
Also, I have redirected www to non-www.
When I added mydomain.tld in alternate domain name filed it starts working.
Also I have to generate SSL in ACM for http://www.mydomain.tld and mydomain.tld.
So all is good now. Thanks for helping
Great, Sanjay! I’m glad everything is working now for you. Thanks for reading and reaching out when things went sideways. Regards, Jeff
I used this guide (roughly) to set up a CloudFront distribution for a LightSail WordPress instance a few months ago. At first, it seemed to be working — it’s really cool to see the locations that are hitting the distribution. However, if I go to a 2-month view of metrics, I have a very low hit to miss ratio. Like — 2% hits and 98% misses. I’m using KeyCDN’s CDN Enabler plug-in. I skipped some of the details in this post to keep the distribution simple, but I’m wondering, too, if a) the CDN Enabler plug-in would conflict (it has path inclusions and exclusion filters) and b) the bots hitting the site cause the hit to miss discrepancy
Hey Michael,
Thanks for reaching out. That certainly seems like an odd problem, and to be honest, I never really looked into my cache statistics while this setup was current (I’ve since switched to NGINX and do caching there), so I can’t say that mine was X% hit/miss. What I can say with a high degree of confidence is that other people have reported issues when using certain plugins, and I had to deactivate a few plugins that relied on some level of connectivity with the server. I can also say that EC2 WordPress installs have the potential to get lots of requests to the xml-rpc endpoint and just other junk that gets thrown at it from bots. Depending on your organic traffic level, or even the amount of time you spend logged in, I guess it is possible that could be a valid stat. Is there a way you can analyze the missed requests to try and make sense of why there are so many of them? That is where I would start, and then move to server logs if I was really curious.
Thanks for reading,
Jeff
Good post on aws
Thanks!
Is this still working for you? I can’t get it to go without adding User-Agent into the default … which seems messed up. I guess it’s needed somewhere other than wp-admin/* these days? But if so, I can’t figure out where, so I’m hoping you’ve already updated your configuration 🙂
Hey Chris,
I’ve actually moved away from this setup to using NGINX and full page caching there, so I can no longer speak to the accuracy of this config, especially as WordPress changes. I’d say that if you get something working, then roll with it and adjust if you go. If you see a really low hit/miss ratio, then it would be worth digging into a bit deeper. Thanks for reading and writing.
Regards,
Jeff
Heyy nice post .Explained so much in detail. I have to do almost same thing i just have one concern thou. For my site there are regular changes to the published content which may be done by the content guys . Now i believe with cloudfront since the posts will be cached how will the changes in post will be reflected real time without invalidating the cloudfront cache since i can’t ask content guys to login to aws and invalidate the cache everytime they push the content changes to website.
In this case, you would want to choose a TTL (time to live) option that was suitable for your audience. For example, you could have the cache pull from the origin every hour or thirty minutes. This may negate some of the performance benefit based on your traffic, but would ensure that your content was already pretty fresh. Without knowing more about your content it is hard for me to weigh in on the specifics. Alternatively, you could build a plugin to purge particular paths of the cache when content is updated, but that would get involved technically. Either way, thanks for reading and feel free to post back with any comments or additional details. Best of luck, Jeff.
Hey Jeff,
Nice info, guaranteed success sharing quality info like this 😉
Regards
Chris
Many thanks for the kind words. Cheers, Jeff