Occasionally, when you are running a Google Script attached to a spreadsheet or document, the triggers that run those scripts can sometimes start to malfunction. Over the last five years, I haven’t been able to identify meaningful patterns for why these triggers and the associated scripts fail, but it just happens sometimes.
However, here are a couple of things to look out for when using a running Google Script:
- If you make changes to the underlying sheet, form, or document, things sometimes break. That can mean changing a setting, adding a form field, or moving a row/column. In my experience, this has been the hardest thing to identify.
- If Google changes something or updates, your stuff can break. Each of these scripts relies on conventions associated with the GSuite ecosystem, so there can be ripple effects if one service changes how it does business.
- Script authorization matters. If you are sharing a sheet and script among people, sometimes this can authorize the script to do funky things. For example, we all might share access to a Google sheet, but the script is authorized to take actions (send email, modify the sheet, etc.) as one person, the original Google account that authorized the script. Having other authenticated users interact with the script tends to make things go sideways.
The Good News
The good news is that these issues are most likely resolved by just resetting the projects associated triggers, and in some severe cases, creating a duplicate script entirely. The good thing is if something starts to error out in a Google Script you own, you should get a notification that looks like this:

In most cases, this will give you some additional information about why and where the script is failing.
Below are the steps to take when you need to reset a project’s trigger.
Reset a Trigger on a Google Script
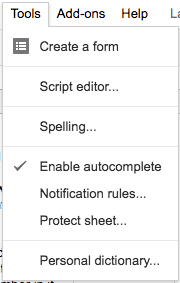
The first thing we need to do is open up the script editor from the Google Sheet or Doc that the script is attached to. To do that, open up the tools menu and click ‘Script Editor,’ which will open up the script editor in a new window:
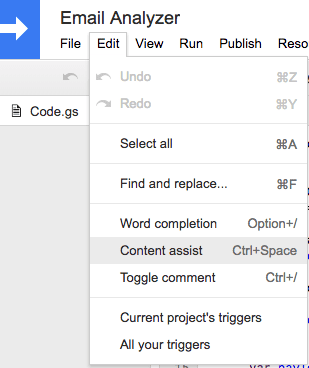
After you’ve opened the script editor, you’ll need to locate the projects triggers and then modify them. In the Script Editor menu, open the ‘Edit’ menu and then locate the dropdown option labeled ‘Current project’s triggers.’
When you click ‘Current project’s triggers,’ it will open up a pop-up. If you don’t have any triggers set, you can set one now. However, if you have an old trigger that is failing, you’ll want to click the ‘X’ button next to the trigger to remove it from the current project. Once you’ve done that make sure to click ‘Save’ and close the popup menu.

Now that we’ve cleared out our failing trigger, you can add a new one. Reopen the current project’s triggers menu, then click the link labeled ‘No triggers set up. Click here to add one now.’
That will give you a set of menus that look just like the options in the image above. GSuite apps support a lot of installable triggers, but in my experience most are either time-driven or used to trigger something when someone submits a form. If that’s the case, where you want to listen for a form submission and then take some action, the configuration above is pretty much the default for that scenario.
Just remember to click ‘Save’ when you add the trigger before closing the menu, and be sure that the function you want to run is selected in the first drop down menu.