After a decent amount of foot shuffling, I finally decided to step up and dig into the Gutenberg editor that will ship with WordPress 5.0, whenever that is ready. There has been a lot of chatter in the WP ecosystem over the last year or so about when this update will be ready, how it will upend or improve existing workflows, and how we as developers can start to work with the new editing experience.
From a personal standpoint, there are a few reasons why I have waited this long to start playing around with the feature that will be the future of WordPress. First, I’ve been feeling a bit of JS framework fatigue lately. Gutenberg is built on top of React, which I have the least experience with, so even the thought of toying around in a serious way necessitated some additional self-learning. Second, all of the examples I’ve seen of blocks are built using Webpack and a slew of other dependencies.
What I really wanted was a bare bones tutorial, sans all of the aforementioned complexities. So, partially because I couldn’t find what I wanted, and partially because making things is how I learn, I’ve created a GitHub repo with some lowest common denominator examples. A few of these are modified versions of what can be found in some of the official docs, but I thought it would be nice to collect some examples for local development.
The Basics of Blocks
It turns out that Gutenberg blocks have a lot going for them. At the basic level, they are pretty simple to create as a part of themes or plugins, as I’ll show later in this post. At the same time, the way they store data as semantic HTML in the post itself is in some ways very preferable to making endless calls to get custom meta fields as a pattern for creating structured content.
At the core of block creation, we need to do two things in our plugin/theme files. We need to create a JavaScript file for the block to use when it is edited and saved, and then enqueue that JS file to make the block available.
Let’s take a look at the minimum JS required to register a simple block:
// wp.element and wp.blocks are both parts of the
// WP JS API, and we need both to create parts of your block
// and register it for use in the editor
var el = wp.element.createElement,
  registerBlockType = wp.blocks.registerBlockType,
  blockStyle = { backgroundColor: '#fff', border: '2px solid #900', color: '#000', padding: '20px' };


// We call the registerBlockType function to register your block type
// for use in the editor. We need to namespace our blocks 'your-namespace/your-block'
// to avoid collisions between our blocks and others
registerBlockType( 'cornerstone-block/test-block', {
  title: 'Cornerstone Block 1',
  // icon can be a dash icon or a path to an SVG/PNG
  icon: 'universal-access-alt',
  category: 'layout',
  // Here we define the edit and save methods. Both of these should return a call to
  // wp.element.createElement with the content we want rendered in our block on edit and save
  edit: function() {
    return el( 'p', { style: blockStyle }, 'This is what appears in the editor.' );
  },

  save: function() {
    return el( 'p', { style: blockStyle }, 'This is what gets saved into post content.' );
  },
} );
Hopefully, most of the comments are enough, but the gist is that we call wp.blocks.registerBlockType and pass it a configuration object that contains save and edit methods, both of which return an element created using wp.element.createElement, which is really a wrapper around React functionality.
One of the things I like already about the block pattern is that I’m not forced to use React. I can use the abstractions provided by the WP JS API instead of dealing with React, at least for most easy things like this. I’m sure I’ll dig into React more over the coming weeks, but I like that I can workaround it for as long as possible.
Enqueue and Register Block in PHP
Now that we have a good sense for the basic JS structure you need to create a block, we need to enqueue the script for the editor and register the block within the core of WP’s PHP. If you’ve done any plugin or theme development in the past, this should look pretty familiar to you already:
function cornerstone_boilerplate_block() {

  // Here we register the script as we would normally, but make
  // sure to pass wp-blocks and wp-element into the dependencies
  // argument at the end. This tells WP that our script relies on the others
  wp_register_script(
    'cornerstone-block-1-js',
    plugins_url( 'cornerstone-block-1.js', __FILE__ ),
    array( 'wp-blocks', 'wp-element' )
  );

  // Here we actually register the block with WP, again using our namespacing
  // We also specify the editor script to be used in the Gutenberg interface
  register_block_type( 'cornerstone-block/cornerstone-block-1', array(
    'editor_script' => 'cornerstone-block-1-js',
  ) );

}
add_action( 'init', 'cornerstone_boilerplate_block' );
Overall, this is still a pretty familiar pattern to most WP devs, and there are even some ways we could make PHP do some rendering here of block content as well, which makes this feel like an easier-to-use shortcode interface. I’ll talk about that in future posts.
What You See Is What You Really Get
One of the largest pushes for a switch to the Gutenberg interface has to do with what can sometimes be a black box of the WP editor interface. Even though TinyMCE is billed as a WYSIWYG editor, in most cases users needed preview the page to see what it would look like styled and rendered.
Gutenberg helps solve some of that problem, by rendering rich HTML directly into the editing interface. For example, this is how our tiny test block is rendered in the editor.
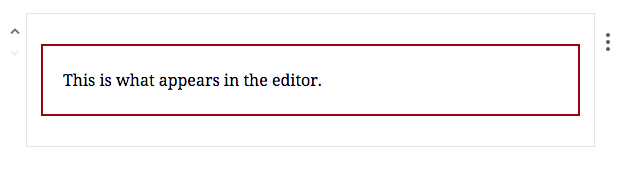
If we look back at our original JS code, we can see that this is the element and content we returned with the edit method attached to our block.
edit: function() {
    return el( 'p', { style: blockStyle }, 'This is what appears in the editor.' );
  },
In a similar fashion, when we update or save the post, the content in the editor switches to whatever element we’ve returned from our save method. This allows us to specify an editing experience for our blocks that is different from how the content is ultimately displayed on the front end.
Our test block uses the following code in our save method:
save: function() {
    return el( 'p', { style: blockStyle }, 'This is what gets saved into post content.' );
  }
And its output looks like this:

Overall, this provides a pretty clear pattern to use when you create blocks. Obviously, we can and will begin to create more sophisticated editing interfaces that require configuration and fuller saved content based on those variables, but this is a good start.
How Blocks Are Saved
Now, you might be asking yourself where some of this configuration data for a custom block gets saved. Most of us have used custom fields to store additional data that we need to construct a custom part of a page, post, or template, but Gutenberg turns that method on its head in a lot of ways. I’m not saying custom fields are going away, or will lose value, but Gutenberg can actually save and retrieve some configuration values from the blocks themselves.
First to understand how this works, lets look at how the content of blocks gets saved into the post content in the database.
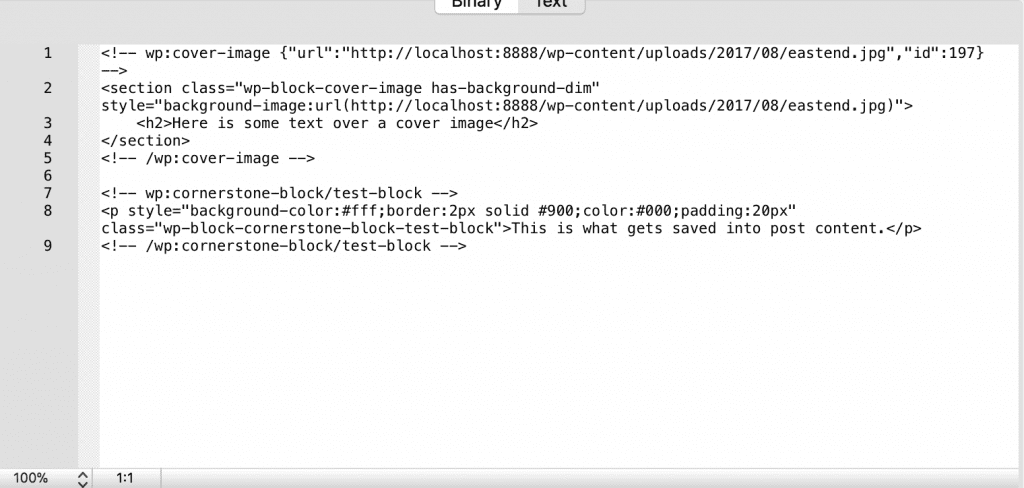
Gutenberg uses a system of comments to bracket all of the HTML produced when you save a block. If we look closer at the actual output, there are also classes added to the block content that we can hook into for CSS style.
By structuring the markup in this way, with all of the additional namespacing provided by the comments and the classes, Gutenberg can grab attributes of content from these DOM elements directly, which means that certain types of data can be stored in the blocks themselves as a part of regular post data.
Overall, its a very cool concept, and we’ll look at that in further details in future block examples, but it should make life a bit easier for developers as well. Meaning we can create a block, define its output, then just deal with it like any other post content. No need to do lots of calls to get_post_meta to construct all of the data we need to render a template.
1 thought on “Digging into the Gutenberg Editor”